
Wooden Stencil Tray
I've always wanted to make a wood tray with slanted sides. The internet didn't have much to offer, but I gave a tray I had to a friend and he figured the angles, cut sample pieces and wrote down instructions. Much better than the internet!

Sample Pieces

Template Tray
This project can get tricky and you need to think about what you're doing every step of the way. Decide what size tray you want. How long and tall will the sides be, etc. The tray for this project is 12 3/4" wide x 18 3/8" long at the top of the handles. A side piece measures 2 3/4" x 17 7/8" x 1/2". The end piece measures 2 3/4" x 12 3/4" x 1/2". If you measure the slant the side is 3" and the end is 4". You can make it out of ply wood or any solid wood. I chose mahogany for this project.
Turn blade on table saw to 17 degrees and rip one side, flip board and move saw guide to the desired thickness and rip. The top and bottom are parallel to each other.
Cut pieces 1" over desired length.

Set up chop saw to 17-degree angle, 42-degree bevel. Try out a few scrap pieces first.

17 Degrees


Put a piece on one side of the blade for right cut, and the other side of the blade for left cut, until you've cut all pieces. Be sure to clamp the pieces you are cutting. You may want to mark your pieces inside, outside, top and bottom.


The tray ends have handles which were cut on a scroll saw. I used the template tray to trace that design onto my end pieces.

The pieces were glued together and held with painters blue tape and a few brad nails in the corners.

On the drum sander we sanded a bottom piece to 1/4" thickness. The sides were cut on the 17-degree angel to match the tray. The bottom piece was glued and nailed. After the glue had dried, nail holes were puttied, and wood was sanded.
Then I was just going to put on a top coat and finish it. But, I was watching a show called Log Cabin Living and on one of the walls by a light switch, there was an image of a wolf. Ah! I could do that! It was lighter than the rest of the wall, like a stencil. I surfed the internet for stencil making and saw a Lowes video where they used contact paper. Brilliant!

This is the label on the contact paper, which is a 20 inch by 30 foot roll. I see a lot of stencils in my future!

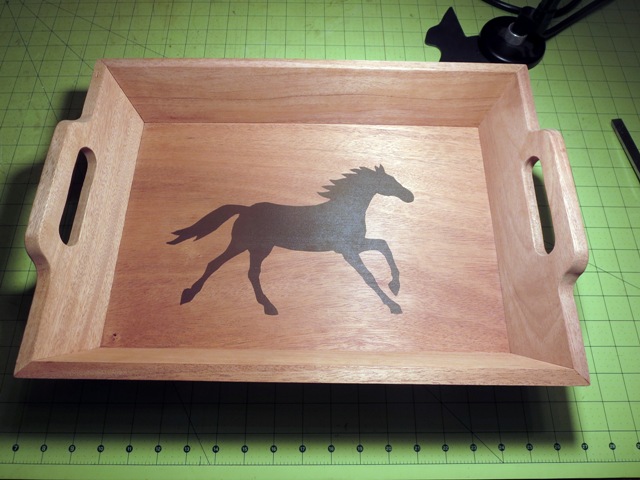
I taped an image of a horse, which I had made of plywood many years ago, to the contact paper and cut it out with an knife. I peeled it and stuck it on the tray, then painted it Real Brown Acrylic by dabbing it on with the brush in a vertical position as they suggested in the video. That was fun and easy!

I thought it came out great!

The last step was to put on a couple of coats of polyurethane. I love it!
I hope these instructions will help you when build your tray. If you have questions, please feel free to use the comment section.
Comments
Post a Comment