Posts

Showing posts with the label Weddings

Wooden Stencil Tray

Image
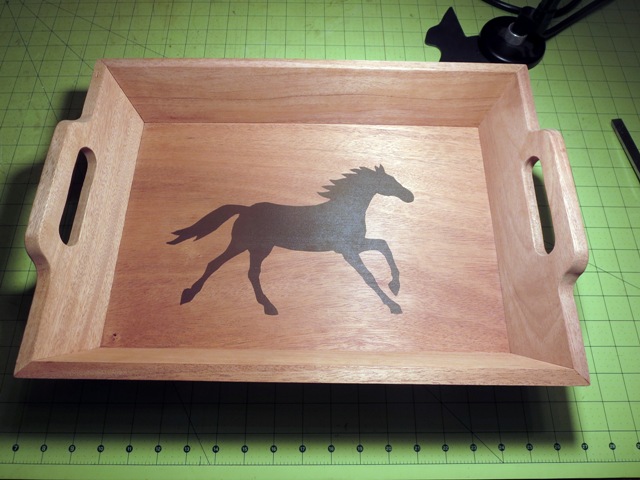
I've always wanted to make a wood tray with slanted sides. The internet didn't have much to offer, but I gave a tray I had to a friend and he figured the angles, cut sample pieces and wrote down instructions. Much better than the internet! Sample Pieces Template Tray This project can get tricky and you need to think about what you're doing every step of the way. Decide what size tray you want. How long and tall will the sides be, etc. The tray for this project is 12 3/4" wide x 18 3/8" long at the top of the handles. A side piece measures 2 3/4" x 17 7/8" x 1/2". The end piece measures 2 3/4" x 12 3/4" x 1/2". If you measure the slant the side is 3" and the end is 4". You can make it out of ply wood or any solid wood. I chose mahogany for this project. Turn blade on table saw to 17 degrees and rip one side, flip board and move saw guide to the desired thickness and rip. The top and bottom are parallel to ...

Horseshoe Cup Holder

Image
This project is a Horseshoe Cup Holder made with wood and Tiny Horseshoes . I drew a design for the feet and cut it on the scroll saw. I glued them onto a wood post and painted it a rustic gray. I screwed on the horseshoes including one on top. You could add more horseshoes and spray paint it your desired color for a jewelry stand.

Horseshoe Wreath

Image
I have always wanted to make a horseshoe wreath, but since I'm not a welder, I created a new way to make it. I used #6 x 3/4" pan head machine screws and nuts. I did enlarge a few holes on the drill press so the screws would fit. These are large cast iron horseshoes. You could use steel horseshoes as well. Getting the right screw is crucial and these fit perfectly. I was so exited, I immediately wrapped red bandanas through the horseshoes. I sprayed the horseshoes silver metallic and wove a pink bandana through the horseshoes, a blue one next to it and tied it in the back. You've got to love this cowboy version! I sprayed one of our  Western Cutouts silver and attached it with wire. I wrapped blue and red bandanas and tied them in the front. Star Horseshoe Wreath with a star burlap ribbon, Mini Star Nails painted red and a painted Star in Circle Cutout hung by wire. Texas Horseshoe Wreath with Texas in Circle C...

Springtime Crafts

Image
Spring is just around the corner so time to bring out the colors of spring. It's easy to make a Spring Hat Wreath. I had this sun hat and found a flower garland at the craft store to wrap around it. I wired on a burlap bow and a twine hanger for the top. Make a horseshoe candle holder by screwing Small Horseshoes onto a block of wood, paint it the colors of spring and add silk or real flowers. Use as centerpieces for weddings or parties. It will hold a 3" pillar candle or... A votive. To make a rustic spring planter I gathered scraps from my weathered pallet wood projects. I glued and nailed the upright pieces to a pallet wood base. I used the rest of the flower garland and tied twine around the  planter. Or you could add daisies and a distressed Cross Nail . Here is another color scheme with a Mini Star Nail . These ideas should give you inspiration to create for Springtime.

Lariat with Frames

Image
When I first wake up in the morning ideas pop into my head. That was the case with this idea. I thought of attaching frames to a piece of lariat rope but found that there are several different ways to do this. I started with the loop end at the top and attached inexpensive frames with a brad nail gun. I was going to cut the rope at the bottom and tassel it. Instead I just hung the remainder of the rope on the top frame. Not bad, but I wanted to try something else. Beginning at the tassel end I doubled enough rope for the frames and tassel at the end. To hold it together I wrapped leather lace at the top, leaving enough for a loop for hanging. I wrapped leather lace at the bottom leaving enough for unraveling into a large double tassel. I attached the frames and hung it on the wall. The rope tended to curve so I nailed in Mini Star Nails to keep it straight and against the wall. I attached the remainder of the rope at the top with leather lace. You could decorate this for the...

Spring Lariat Wreath

Image
Make a Spring Lariat Wreath for Mother's Day, Valentine's Day or just to celebrate the Spring! I had a pink lariat rope in which I zip tied together at the top. I zip tied a burlap bow to the rope and added raffia to cover the zip tie. I drew and cut a heart out of plywood with the scroll saw and painted it white. I applied crackle medium, let dry and added pink paint. I painted jute twine white and hot glued it around the heart. For the letters I used acrylic paint markers and tied the heart to the top with white thread. Silk flowers were inserted into the rope at the top. This should give you some ideas to create your own Springtime wreath.

Stirrup Candle

Image
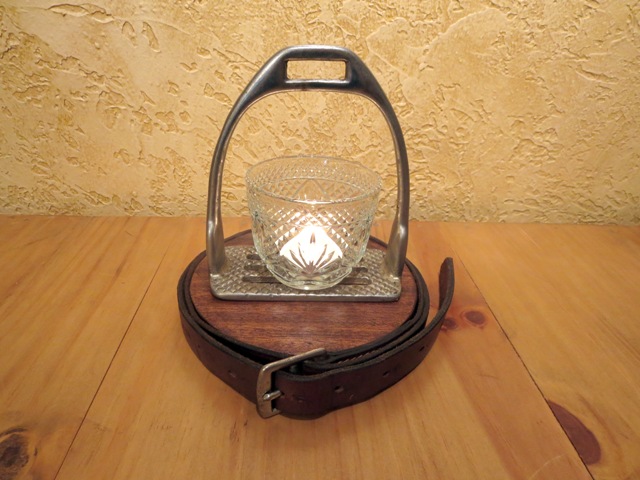
Here's a way to use old stirrups in your home décor. I cut a 6 1/2" disc out of wood and rubbed on a coat of dark brown Briwax. I wrapped the stirrup leather around the wood and placed the stirrup and tea light on top. Gather several old stirrups from friends and family to create table center pieces for parties. You could also use a flameless candle. I sanded the disc and painted it aqua and white and added 3/4" silver Clavos  around the edge. Here's another old stirrup I've had for many years. I used a 5" cast iron Star in Rope  and the Leather Star Bracelet (No longer available) to connect it together. Stirrup Towel Holder

Cowhide Tray

Image
Turn a wooden tray into a western cowhide tray. You can purchase the Wood Tray here , or you can use any wood tray you have. First I sanded the bottom of the tray and vacuumed the saw dust. I cut a template out of cardboard and placed on the cowhide to mark it and cut it out. Next I placed the cowhide on wax paper and brushed Titebond Original glue onto the cowhide. Be sure to brush out to all of the edges. Then place the cowhide into the tray and slide around until it fits. Keep smoothing it down to make sure the whole surface of the cowhide is in contact with the surface of the wood. I used my fingers, but you might want to use a roller. You could nail furniture tacks around the edges, but I like it the way it is.

Cross Bench

Image
You can use our Cross Brackets to make this simple bench. The top piece is 11 x 36 x 1 1/2 and the legs are 11 x 16 x 1 1/2 pine. Four Cross Brackets were screwed into the top piece and leg pieces. I removed the hanger from each of the small crosses which I wanted to attach to each leg. Then found a longer screw that would fit it and drilled a hole in the leg piece. Use a counter sink bit if necessary. Screw the cross to the leg piece from the inside. After the dark brown Briwax  finish was applied I noticed my sanding marks which gave it a distressed look. There are several other types of braces on the website that you could use such as Star Braces, Cobb Webb Braces, and Horse Braces. The items used in this project are: Cross Bracket Small Cross D58-078