Posts

Showing posts with the label Rustic

Candle Lantern

Image
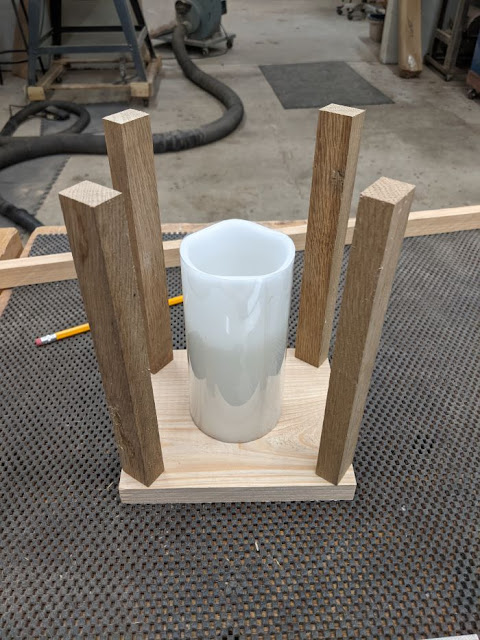
  Candle lanterns are so popular and there are endless ways to decorate them. So, I thought, why not make one? Instead of the posts being square with the base, I decided to angle them 45 degrees. I went with the wood I had. The barn wood posts are 8 1/2" tall x 1" x 5/8". The cypress base is 6 9/16" x 5 5/8" x 3/4". The top piece consists of 2 pieces that are 3 11/16" x 1" x 3/4" and 2 pieces that are 6 9/16" x 1" x 3/4". After assembly, The Candle Lantern will be 10" tall. To make the top piece, I arranged the pieces on top of the base to keep them square. Glue, clamp and let dry overnight. A board was clamped to the table saw fence. Each post was glued on one end, placed on the base and against the 'fence board' and nailed. Blue tape was placed on each corner of the base to show exactly where each post should be placed on a diagonal. Glue was applied to the other end of each post and top piece was nailed on. I u...

Heart Coat Rack

Image
  What the world needs now is LOVE! For Valentine's Day I had to make something with a heart. I was going to make a little pallet wood box and put the wooden heart on the front, but I ran out of time. I looked at the pallet wood pieces I had, and this project came to me. These 2 wooden items are from previous blogs, so they will be recycled twice! This board was part of a cross in another blog, so it has a cut-out section. The wooden heart was drawn and cut with a scroll saw. I placed the wooden heart on the cut-out section and traced it with a pencil. I painted the background and the hooks Tuscan Red. I glued on the wooden heart. I screwed in the hooks and painted the screw heads. A quick and easy and cute Heart Coat Rack, spreading the message of Love. Happy Valentine's Day!

Rustic Horseshoe Tack/Coat Rack

Image
  We have several pieces of cherry wood in the shop that was given to us. I thought it would be perfect for this project. The top piece is the main piece, which is 18" wide x 7 14" tall. The other piece I will use to cut 2 spacers which are 8" x 1 1/2". I will use 3 large cast iron horseshoes which are 4 1/2" x 4 1/2", but you can use any kind of horseshoes. I want to place the spacers on the main piece and screw in a horseshoe on each end and one in the middle. I glued the left spacer with Titebond 3, let it dry overnight and put a couple of polyurethane coats overall, including the right spacer. After I spray painted the horseshoes black and let dry, I screwed one horseshoe in the end of the right spacer. Each horseshoe will have 2 one-inch dry wall screws. Pilot holes were drilled beforehand. I glued the right spacer with horseshoe attached and let it dry overnight. I screwed in the other 2 horseshoes on each end. On the back of the piece I measured fro...

Buckle Display Box

Image
I was called upon to create Buckle Display Boxes for prizes for rodeo events, so I thought this would be a great project for this blog. We decided on a 3 buckle box. After studying a friend's display box, these are the dimensions I chose, but they are not firm, so you can use this as a base to work from. This project is fairly easy to make. The hardest part is choosing paint colors and decoration. Red Oak pieces were cut out. Pictured is a strange rasp that was in the wood shop which I thought I would use to distress the wood. Instead I used a wire brush on the drill press. Distressing the wood. I painted all the pieces an acrylic vintage white. I didn't worry about complete coverage. This is one of my favorite brushes. I took and old fan brush and trimmed it with scissors. I dipped the brush into the paint and removed the excess. I lightly spread on the second color (acrylic aqua). You can see the detail of the distressed wood. I applied a little glue and nailed it all togethe...

Bookends

Image
I saw a picture of a handmade rustic bookend with clavos and it gave me an idea to create western style bookends. The possibilities are endless! We have a lot of scrap ash wood in our shop, so I decided to make the bookends from those scraps. I had a set of small scroll shelf brackets and thought it would be an easy bookend. I cut out the scallop design on the scroll saw. All the bookends in this project are approximately 6.5" wide x 7.5" tall x 3" deep. The wood is 7/8" thick. The Boot and Horse cutouts are approximately 7/8" thick. I painted the wood dark brown acrylic, let dry, then antique white, let dry and sanded some of the white off. I screwed on the bracket, which held the bookend together. I traced the horseshoe onto wood and cut it out on the scroll saw and screwed the horseshoe to it. I spray painted it black. I found a few pieces of teak, glued and screwed them together and added 2 coats of polyurethane. I glued and s...

Wooden Star Stirrup

Image
This Cast Iron Star Stirrup was on the website, but I have not been able to find anymore. So, I decided to make one out of wood. I placed the stirrup on plywood and traced it to make a template. I traced the star section and cleaned up the lines before I cut it out on a scroll saw. Once the templates are made, I can trace this pattern onto any wood I choose. This is cut from mahogany. When I glued and screwed it together, it broke apart. I cut another one from oak and glued it together. I used a brad nail gun to secure it. I spray painted it with a textured paint. I made another one and stained it to show the wood grain. I used epoxy on this one, which seems to work better. These Star Stirrups will make great western home décor accents!