Posts

Showing posts with the label Birthdays

Buckle Display Box

Image
I was called upon to create Buckle Display Boxes for prizes for rodeo events, so I thought this would be a great project for this blog. We decided on a 3 buckle box. After studying a friend's display box, these are the dimensions I chose, but they are not firm, so you can use this as a base to work from. This project is fairly easy to make. The hardest part is choosing paint colors and decoration. Red Oak pieces were cut out. Pictured is a strange rasp that was in the wood shop which I thought I would use to distress the wood. Instead I used a wire brush on the drill press. Distressing the wood. I painted all the pieces an acrylic vintage white. I didn't worry about complete coverage. This is one of my favorite brushes. I took and old fan brush and trimmed it with scissors. I dipped the brush into the paint and removed the excess. I lightly spread on the second color (acrylic aqua). You can see the detail of the distressed wood. I applied a little glue and nailed it all togethe...

Decorative Cross

Image
I was cutting out these shelf brackets from mahogany and noticed a pretty left-over design. Well, I must make something out of that! An idea came to me to make a Decorative Cross piece. The dimensions of this piece are 5" wide x 14" tall. I knew mahogany had a dark rich tone when sealed with a clear sealer. For contrast I squiggled some acrylic turquoise lines to look like turquoise inlay. Since this is the back, I could practice my technique. A Key hole was installed on the back for easy hanging. I put a finish on a Leather Cross , then glued on a metal Cross with regular Gorilla Glue. I've never used this glue before, and it worked great! I sawed off the little loop hanger at the top of the metal cross and filed any sharp edges. I wanted to sand some of the sealer so I could glue on the leather cross. I traced the cross onto contact paper, cut it out and taped it onto the wood. After sanding, I glued the leather cross onto the wood using...

Wooden Star Stirrup

Image
This Cast Iron Star Stirrup was on the website, but I have not been able to find anymore. So, I decided to make one out of wood. I placed the stirrup on plywood and traced it to make a template. I traced the star section and cleaned up the lines before I cut it out on a scroll saw. Once the templates are made, I can trace this pattern onto any wood I choose. This is cut from mahogany. When I glued and screwed it together, it broke apart. I cut another one from oak and glued it together. I used a brad nail gun to secure it. I spray painted it with a textured paint. I made another one and stained it to show the wood grain. I used epoxy on this one, which seems to work better. These Star Stirrups will make great western home décor accents!

Rustic Frame with Conchos

Image
Old wood from old barns and buildings, which included red and white oak, was used for the cabinetry in our kitchen remodel. This wood is dense, heavy and very strong. The kitchen crew rebuilt some of our cabinet doors, so in this project I'm using the cabinet door reject scraps. Since the cabinet door frames had this groove on it for panels, I thought it would be perfect for making picture frames or mirrors. I cut off half of the groove on the table saw to create a place for a picture or mirror. I cut the boards to make a 16" x 20" opening. The outside dimension of the finished frame is 20" x 24". My plan was a rustic looking turquoise color and add large 2 1/4" conchos to the corners and center 3 3/4" silver clavos on each side. I glued it together and nailed it with a brad nail gun on the edges at the corners and used a staple gun on the back corners. This would look good with a coat of polyurethane, but I wanted to ...

Hat Bands

Image
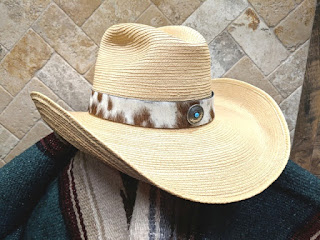
Fall Activities are coming up and what better way to show off your style than to wear a hat band that you made yourself. Here are 6 different styles that are easy to make. I used a palm leaf hat to model the hat bands. Just wet it in the sink, form it into any style you want, and let dry. If you make a mistake, rewet it and fix it. I attached a Rhinestone Star Pin to a grosgrain ribbon for this style. You can also add pins to the hat. I wove a 5/8" x 46" black grosgrain ribbon through eight 1 1/2" slotted conchos. Tie the ribbon in a square knot in the back and let the ends dangle. Or you can tie it in a bow. I cut a 1" x 23 1/2" strip of veg tan leather, painted it black and attached 2 types of rivets. I cut an extra piece for a keeper in the back. I stapled the ends together and glued the keeper on the band using Titebond. I got a little off on the staples but it worked. Here's how it looks in the back. ...

Horseshoe Hooks

Image
When I saw a picture of horseshoes and hooks welded together for a coat rack, the idea came to me that I could screw our Small Coat Hooks into Large Horseshoes to make Horseshoe Hooks. I placed a Small Coat Hook on the bottom of a Large Horseshoe and made marks for drilling the holes. Clamp your horseshoe on the drill press. Use a 9/64" bit and drill holes for the hooks and enlarge two top holes in each horseshoe. I drilled 4 horseshoes. I had a piece of pecan left over from my kitchen bar and even though it's cracked I screwed the horseshoes and hooks into it. Dry wall screws (#6x1") are perfect for this project. I drilled pilot holes and nailed in Small Star Nails . If you want to decorate the horseshoes you can choose from small tacks, nails or conchos that we have on the website. You can paint the horseshoes, hooks and wood in the colors of choice or leave as is. I wanted to go one step further and add a ba...