Posts

Showing posts with the label tray

Leather Tray

Image
I always wanted to mold leather into a tray. I had a piece of embossed leather and used an old 8" x 8" metal cake pan for the mold. I cut flaps on the corners of the leather and failed to take pictures of that step. Here is a diagram of how I made the cuts. I filled the sink with warm water enough to cover the leather and let it soak for a minute. I molded the leather onto the pan. I used thin pieces of wood on the sides to uniformly clamp the leather to the pan. Since a bit of metal color came off on the leather, it is a good idea to spread plastic wrap over the pan before the leather is applied. I let this dry completely. It worked very well. I put a leather finish on the leather. The plan was to glue the flaps and attach rivets, but I thought it would look better with a smooth leather strip around the outside. The leather strip is molded just like the tray. This time I put plastic wrap on the cake pan, then placed the leather tray over it. I...
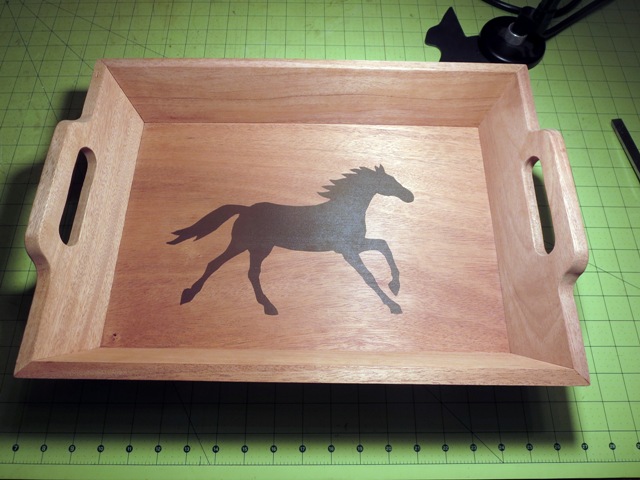
Wooden Stencil Tray

Image
I've always wanted to make a wood tray with slanted sides. The internet didn't have much to offer, but I gave a tray I had to a friend and he figured the angles, cut sample pieces and wrote down instructions. Much better than the internet! Sample Pieces Template Tray This project can get tricky and you need to think about what you're doing every step of the way. Decide what size tray you want. How long and tall will the sides be, etc. The tray for this project is 12 3/4" wide x 18 3/8" long at the top of the handles. A side piece measures 2 3/4" x 17 7/8" x 1/2". The end piece measures 2 3/4" x 12 3/4" x 1/2". If you measure the slant the side is 3" and the end is 4". You can make it out of ply wood or any solid wood. I chose mahogany for this project. Turn blade on table saw to 17 degrees and rip one side, flip board and move saw guide to the desired thickness and rip. The top and bottom are parallel to ...

Rustic Tray

Image
Trays are good to have around during the holidays. Use them to serve your guests or decorate with your favorite holiday décor. Take this idea and make it your own. I cut 4 pallet boards 13 1/2" long. I used a nail gun to nail 2 boards 19 3/4" long to the back of the 4 short boards. I cut off pieces of a pallet support board for the handles and nailed them into the bottom boards. I added Clavos to the top of the handles. I added smaller Clavos to the ends of the 4 short boards. Happy Holidays!

Star Tray

Image
I made a wood star tray with molding for the sides. The shape is like a primitive star. You will be cutting 10 pieces any length you want. These were about 5 inches and the star was about 13 1/2 inches wide. You may want to cut scrap pieces before cutting the actual molding. First make a jig for the cuts at the points of the star. Screw a piece of wood onto a piece of 1/2 inch plywood at 54 degrees. Put your miter saw at 30 degrees and clamp and cut each piece making sure to lay it on the correct side so that the cut pieces fit together. Cut the pieces about 2 inches longer than you want them to be. Diagram of the jig. The other end is cut at 30 degrees. Clamp a scrap piece and place the piece to cut against it so they will all be the same length. Clamp each piece you are cutting so it doesn't move and make sure to lay it on the correct side. Tape all the pieces together to make sure they fit, then glue and tape. Let dry overnig...

Photo Tray

Image
I took apart the Western Coat Rack, cut the longer boards a little shorter and attached the back support boards to the front with our small handles and screws to make a photo tray.

Breakfast Tray

Image
To make a Rustic Western Breakfast Tray, I took wide weathered pallet boards and cut them the size I wanted. I painted the cut ends by using various watered down mixtures of gray, brown, black and white acrylic paint and wiping it off with a damp rag. I screwed the top boards to the side boards and attached corner braces underneath for strength. I screwed in the Large Horseshoes for handles. The dimensions are approximately 20" wide x 10" deep x 6" tall. This tray can be used as a breakfast tray in bed or on the couch. Or use it for reading a book or writing.

Country Tray

Image
When I saw this wall paper border I knew I wanted to make a tray. As we were arranging the sides I thought it might be different to have over lapping corners. So we glued it together one side at a time and used the brad gun for more security. Then we clamped it and let it dry overnight. We drilled holes for rope handles. I did several samples of crackle finish and chose the red with a light tan base coat. Here's the tray with a crackle finish. After it dried I applied the wall paper border with Mod Podge. I used the brayer to smooth it out. When I put a coat of Mod Podge over the top of the picture, the crackle paint started coming off and it made a big mess. So, I had to sand all of that down, put painters tape on the picture and re crackled it. Then I used a spray varnish to seal it. I inserted the rope handles and tied in knots. If I did this again I would apply the picture first, then tape it and apply the crackle finish around i...