Posts

Christmas Crafts

Image
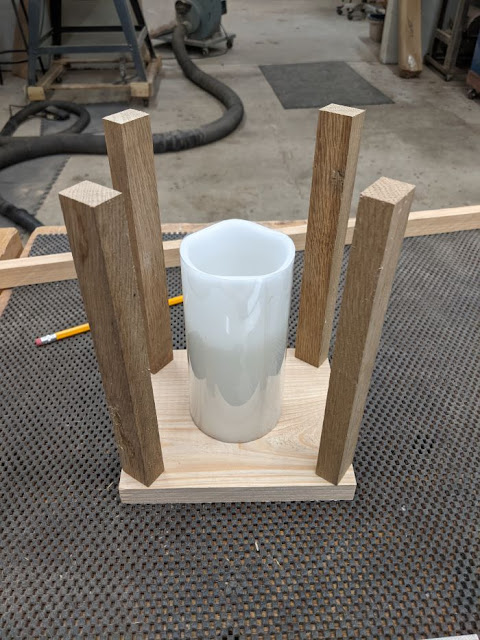
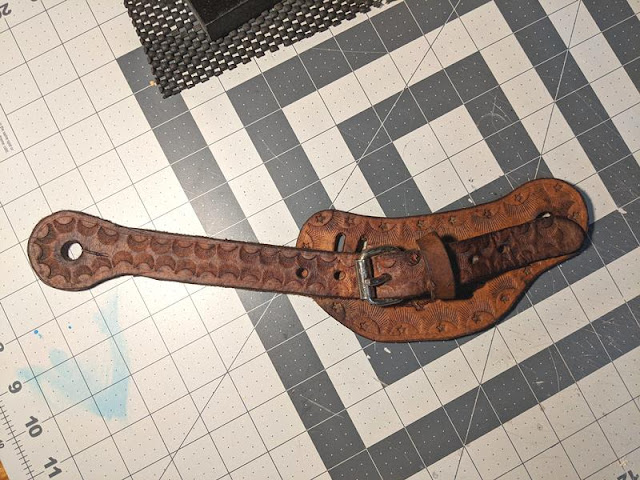
  This will be my last blog post for a while. I love to create but after doing this on a schedule for 8 years, I need a little break. If I create something I feel the world needs to see, I will post it! Included here are most of the Christmas creations I've done over the years. Most, but not all, are on the Blog. Enjoy! The 1st photo is a Grapevine Wreath . Holiday Lariat Basket Candle Lantern Christmas Lariat Wreath Christmas Tree Horse Ornament Tool Caddy Horseshoe Wreath Western Boot Key Chain ornaments Horseshoe Swag Horseshoe Hanger Western Cutouts ornaments Red Horse Maybe these photos will inspire you to create your next Christmas Decoration! Have a great Holiday Season and a very Merry Christmas!

Candle Lantern

Image
  Candle lanterns are so popular and there are endless ways to decorate them. So, I thought, why not make one? Instead of the posts being square with the base, I decided to angle them 45 degrees. I went with the wood I had. The barn wood posts are 8 1/2" tall x 1" x 5/8". The cypress base is 6 9/16" x 5 5/8" x 3/4". The top piece consists of 2 pieces that are 3 11/16" x 1" x 3/4" and 2 pieces that are 6 9/16" x 1" x 3/4". After assembly, The Candle Lantern will be 10" tall. To make the top piece, I arranged the pieces on top of the base to keep them square. Glue, clamp and let dry overnight. A board was clamped to the table saw fence. Each post was glued on one end, placed on the base and against the 'fence board' and nailed. Blue tape was placed on each corner of the base to show exactly where each post should be placed on a diagonal. Glue was applied to the other end of each post and top piece was nailed on. I u

Boot Lariat Wreath

Image
  It's hard to get into the Fall spirit in Texas when the weather is hot and dry and the leaves on the trees are turning brown and falling off instead of turning beautiful colors. I wanted to make a Fall lariat wreath and add a bright red boot, and about the time I was creating it, I think I ushered in the season, because the nights stared turning cooler! I chose a lime green used lariat for this project. I wrapped the lariat on one side with green wire so I would have a place to stick foliage. I stuck in Fall foliage. Don't go any further and you have a nice simple Fall wreath. I experimented by attaching a Halloween bow, but decided to leave it off. I cut out a boot shape from plywood and spray painted it red. I drilled a hole in the middle and attached a 2 3/8" concho I had on hand. I attached the boot to the lariat with a hot glue gun. It's easy to make a wreath with a lariat. Let your imagination and creativity propel you to success!

Buckle Display Strap

Image
  Buckle Display Strap Strap - 45" x 5" (Hair-on cowhide with 8-9 oz. backing) Tooled Pieces - 5" x 3 3/4" Buckle straps - 1 1/2" x 2 3/4", 3/8" from right edge Spacing between buckle straps - 2 1/2" Buckles - 4 1/2" x 3 1/2" 2 D-rings I was asked to make a buckle display on a strap. I looked on the internet and found one that looked like a cinch, so I decided to make one to resemble a cinch. I had several cowhide scraps that were given to me by the person that wanted the buckle display. I used one of those hides for this project. I borrowed several buckles from a friend so I would know how long and wide to make it. The customer wanted to display 6 or 7 buckles and I decided to make it 7. Go for the most, right? I cut a piece of cowhide about 48" long to allow for riveting on D-rings x 5" wide.  The customer wanted their brand on it, so I designed a tooling piece around their brand. I tooled a Texas star for the bottom of the

Cowhide Wine Wrap

Image
  I was asked to make cowhide wraps for wine bottles, so I got to work and featured it as a blog project. I cut a piece of hair on cowhide 13 1/2" x 8 1/2" and the same size liner. For the liner I used 3-4 ounce vegetable tanned leather on the first 5 wraps I made. I looked for other possible liners and thought of neoprene. I glued the cowhide to the neoprene and sewed it on the sewing machine. I punched 4.8mm holes for 2 conchos which are 1 1/2" wide. I punched 2.8mm holes for 20" leather lace knotted at one end. The concho holes are placed 2" from the top and bottom edge and 1 1/2" from the side edge. The lace holes are placed 2" from the top and bottom edge and 3 3/4" from the side edge. I attached the conchos and lace, wrapped the cowhide around the bottle and wrapped the lace around the conchos. Here are several wraps I made. These would make great gifts! Have fun making your own wrap!

Spur Strap Tutorial

Image
  I've been doing a lot of leather work lately, mainly because people ask me to make things and I try to make them. But I love working with leather and I have learned by watching videos on the internet. A friend asked me to make a pair of spur straps to give as a gift. I put the photo of the spur straps I made on social media and here I am 5 pair of spur straps later. I am by no means an expert, but I thought I could show you how I make a pair of spur straps. My neighbor, an old-time cowboy, made himself a pair of spur straps. I borrowed his for a template and put my own "stamp" on it, literally! About a 12" x 12" piece of veg-tan leather that is 7-9 ounces will be enough for this project. I trace the shape onto the leather and cut it out. The spur hole is 3/8" and the oblong holes are 1". I flip the template for the opposite foot. The strap templates are also cut out and 3/8" holes punched. A slit is cut from the 3/8" holes. A 3/4" half