Posts

Showing posts with the label hooks

Horseshoe Hooks

Image
When I saw a picture of horseshoes and hooks welded together for a coat rack, the idea came to me that I could screw our Small Coat Hooks into Large Horseshoes to make Horseshoe Hooks. I placed a Small Coat Hook on the bottom of a Large Horseshoe and made marks for drilling the holes. Clamp your horseshoe on the drill press. Use a 9/64" bit and drill holes for the hooks and enlarge two top holes in each horseshoe. I drilled 4 horseshoes. I had a piece of pecan left over from my kitchen bar and even though it's cracked I screwed the horseshoes and hooks into it. Dry wall screws (#6x1") are perfect for this project. I drilled pilot holes and nailed in Small Star Nails . If you want to decorate the horseshoes you can choose from small tacks, nails or conchos that we have on the website. You can paint the horseshoes, hooks and wood in the colors of choice or leave as is. I wanted to go one step further and add a ba...

Serape Arrow Coat Rack

Image
For this project I turned an old cabinet door from my kitchen remodel into a beautiful colorful Serape Arrow Coat Rack! Here is what the cabinet door looked like originally. I sanded down the door. It's ugly now, but will become beautiful! A smaller drawer panel became my practice piece. I tried to find serape fabric or serape wrapping paper with no luck, so I decided to find a photo of a serape blanket on the internet and print it out on a large format printer. I cut the photo to fit onto the drawer panel and after painting a thin coat of Mod Podge, I placed it on the panel. I smoothed it out with my fingers and a brayer. After it had dried I added a coat of Mod Podge in matte finish. I drew an arrow on 1/4" plywood and cut it out on the scroll saw. I cut out a second one and painted both arrows coordinating acrylic paint colors. After it dried I sanded a little paint off, then brushed on a coat of Mod Podge. I painted the frame blues and yellows ...

Texas Coat Rack

Image
I saw this coat rack in a local antique store and noticed many of the items are in our store so I thought I'd try to make one like it. I gathered pieces of weathered pallet wood, cut and placed them like I wanted them. Pictured are the approximate dimensions of the boards. They are 1/2" thick. The trim was cut on a table saw and they are 1/2" x 1". The finished project was 22 1/4" wide x 20 1/4" tall. My version appears to be a smaller scaled down version of the original. The boards were put together with biscuits and glue then clamped. The center support is 1 1/8" wide.  The trim was glued and nailed with a brad gun. The little corner pieces  are 1/4" thick and were glued and nailed with a brad gun. I bought 2 10" x 10" mirrors from the craft store and installed them with mirror clips. I sprayed all of the iron pieces with vinegar and placed them in the sun to rust. The iron pieces were then sprayed with a cl...

Caps Keys & Coat Rack

Image
From this day forward there will be one post a month on the first Monday of every month. Now, today's project: Create a place for your caps, keys, coats, and umbrellas. Nail horseshoe nails to a Large Horseshoe on a weathered pallet board or any type of wood. Screw in Large Coat Hooks or Hall Tree Hooks . Paint the wood or cast iron any color  you desire or leave as is. This would be very handy right by the door so you can grab on your way out or hang up as you come in.

Western Coat Rack

Image
Make a rustic Western Coat Rack using weathered pallet boards and your favorite picture. I chose, cut and laid out the weathered pallet boards. Then screwed supports on the back. I printed a photo and placed it on the boards with double stick tape. I cut a slit in the photo between the boards to make 2 pieces. With painter's tape I outlined the photo, then removed the photo and the double stick tape. I spread a coat Mod Podge, placed the photo and spread another coat over the top. I smoothed with my fingers and a brayer, but it still wrinkled a bit. Maybe it was the type of paper I used. I pulled up the tape after it dried and screwed in Hall Tree Hooks and Small Coat Hooks . Here's another idea. Screw hooks to your favorite framed picture for quick entry way coat rack.

Horseshoe Shelf

Image
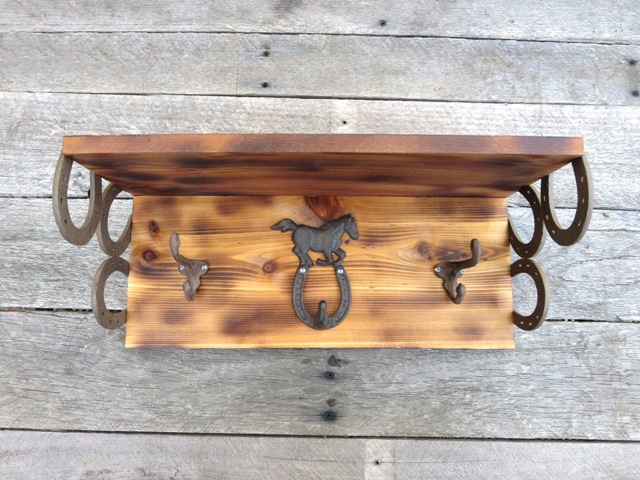
When I was sketching the plan for a spur brace I also came up with the idea of using horseshoes for a brace. This shelf is about 18" long out of cedar that has been burned with a torch and finished with clear sealer. I screwed the shelf to the bottom board then I screwed Small Horseshoes which had been spray painted a textured brown to the ends to form the braces. I added Coat Hooks and a new  Horse Hook  we have on the website. Here's a close up of the end of the shelf.

Star Coat Hook

Image
Use our Star Braces to make a Coat Hook/Shelf. Find the wood pieces you want to use. This happens to be cedar and I believe I put a wax finish on it. You can use any finish or paint it the color of your choice. Drill holes for Star Nails, hooks and 2 Star Braces. Find studs in your wall and use screws to mount it. And here you have a handy Coat Hook/Shelf for the Mud Room, Entry, or Bedroom. From the store you can buy these items: Star Nails Star Brace Coat Hooks