Posts

Western Cutouts

Image
Western cutouts are great fun and they can be used in so many ways. I drew and cut them out of plywood on a scroll saw. You can cut them out of cardboard, leather or thick paper. You can paint or stain them and then you can: Glue them to a skewer to stick in flower arrangements. Drill a hole in each and add jute to make ornaments. Glue them to boxes or frames. Make Garland. Drill a hole if it's wood or leather and make a key fob. Attach a hook to display on your saddle. It doesn't have to be western. You can make any shape you want, such as Christmas cutouts. Choose your theme, cut out your shapes and create!

Wooden Star Stirrup

Image
This Cast Iron Star Stirrup was on the website, but I have not been able to find anymore. So, I decided to make one out of wood. I placed the stirrup on plywood and traced it to make a template. I traced the star section and cleaned up the lines before I cut it out on a scroll saw. Once the templates are made, I can trace this pattern onto any wood I choose. This is cut from mahogany. When I glued and screwed it together, it broke apart. I cut another one from oak and glued it together. I used a brad nail gun to secure it. I spray painted it with a textured paint. I made another one and stained it to show the wood grain. I used epoxy on this one, which seems to work better. These Star Stirrups will make great western home décor accents!

Rustic Frame with Conchos

Image
Old wood from old barns and buildings, which included red and white oak, was used for the cabinetry in our kitchen remodel. This wood is dense, heavy and very strong. The kitchen crew rebuilt some of our cabinet doors, so in this project I'm using the cabinet door reject scraps. Since the cabinet door frames had this groove on it for panels, I thought it would be perfect for making picture frames or mirrors. I cut off half of the groove on the table saw to create a place for a picture or mirror. I cut the boards to make a 16" x 20" opening. The outside dimension of the finished frame is 20" x 24". My plan was a rustic looking turquoise color and add large 2 1/4" conchos to the corners and center 3 3/4" silver clavos on each side. I glued it together and nailed it with a brad nail gun on the edges at the corners and used a staple gun on the back corners. This would look good with a coat of polyurethane, but I wanted to ...

Grapevine Wreath

Image
Making wreaths for Christmas is easy and fun! I used our 12" metal Star in Ring and an 18" grapevine wreath. Nothing says rustic and natural like a grapevine wreath. I wired the star to the wreath and made a bow and wired it on at the bottom. I added pieces of greenery and tied large rustic bells to the wreath with twine. In the beginning I was going to paint the star and bells red, but I like it just like this! For a western style wreath I used a 16" grapevine wreath and cut the top out with a saw to make a horseshoe. I added a bow at the bottom and pieces of greenery. The twig balls were in a package which I bought years ago. I thought the little twig balls would be cute with the twig wreath, so I spray painted them red and used hot glue to attach. I drew the horse on plywood, cut it out on the scroll saw and painted it red. I wrote "Howdy Y'all!" with a white paint pen. I used hot glue to attach it to the wreath. What i...

Window Picture Frame

Image
This window picture frame, which I bought at a craft store many years ago, was behind my stove in the old kitchen, but I thought I'd repurpose it. I'm sure you can still find these type of frames, or you could make your own. Another idea is to find antique windows from old houses. Print out your favorite picture or have it printed by a print service. This photo is of my two mares who were sisters. November is about the family getting together and celebrating what we are thankful for. You could print out several family photos and place one in each pane. I found a board that was already finished and was the perfect size for the shelf. It is 31" x 3 1/2" x 3/4". The window Frame is 30 1/2" x 23" tall. I drew and cut out these shelf braces on the scroll saw and gave them the same finish as the shelf, which is dark brown Briwax. I thought about painting the whole thing one color and distressing it to look old, but I like the contrast....

Western Fall Decor

Image
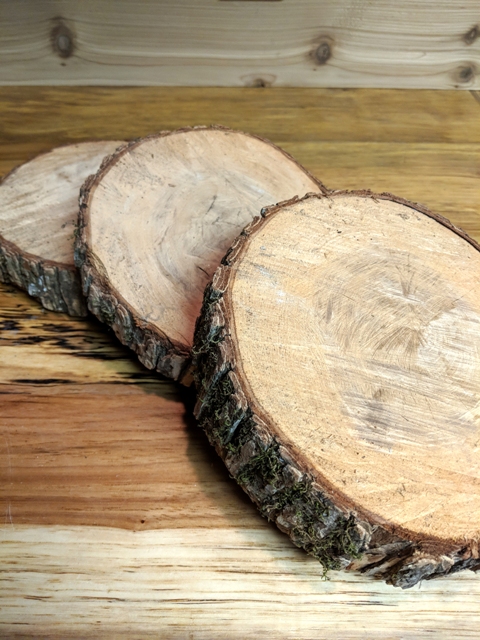
Here are a few things I put together for Western Fall Décor Ideas! These Wood slices were cut from a downed tree on our property. They were in the shed drying out for a couple of years. You can sand and seal and use them for a variety of things. I didn't sand these since I will be using them for another project. Wood Slice Centerpiece - I made a center piece with fall foliage in a horse pitcher, a ceramic Halloween pumpkin and fall leaves and gourds all placed on the wood slices. Lariat Wreath - Take a lariat and zip tie it at the top, wire on a bow and insert fall foliage. Easy! Horseshoe Wreath - I took a 16" grapevine wreath and cut the top off with a saw to make a horseshoe shape. I tied the ends at the top with brown wire just to keep it from coming apart, but it held its shape very well without it. I stuck in foliage and wired on a bow. I drew and cut out the plywood galloping horse on a scroll saw. I painted it and used a paint pen to write the...

Hat Bands

Image
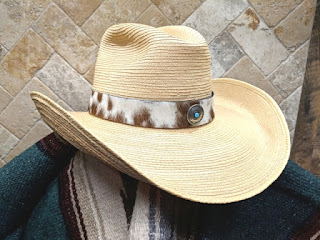
Fall Activities are coming up and what better way to show off your style than to wear a hat band that you made yourself. Here are 6 different styles that are easy to make. I used a palm leaf hat to model the hat bands. Just wet it in the sink, form it into any style you want, and let dry. If you make a mistake, rewet it and fix it. I attached a Rhinestone Star Pin to a grosgrain ribbon for this style. You can also add pins to the hat. I wove a 5/8" x 46" black grosgrain ribbon through eight 1 1/2" slotted conchos. Tie the ribbon in a square knot in the back and let the ends dangle. Or you can tie it in a bow. I cut a 1" x 23 1/2" strip of veg tan leather, painted it black and attached 2 types of rivets. I cut an extra piece for a keeper in the back. I stapled the ends together and glued the keeper on the band using Titebond. I got a little off on the staples but it worked. Here's how it looks in the back. ...