Posts

Showing posts with the label wood

Wooden Star Stirrup

Image
This Cast Iron Star Stirrup was on the website, but I have not been able to find anymore. So, I decided to make one out of wood. I placed the stirrup on plywood and traced it to make a template. I traced the star section and cleaned up the lines before I cut it out on a scroll saw. Once the templates are made, I can trace this pattern onto any wood I choose. This is cut from mahogany. When I glued and screwed it together, it broke apart. I cut another one from oak and glued it together. I used a brad nail gun to secure it. I spray painted it with a textured paint. I made another one and stained it to show the wood grain. I used epoxy on this one, which seems to work better. These Star Stirrups will make great western home décor accents!

Table Lamps

Image
This is my first time making table lamps and it's so easy that I had ideas for about 10 western style lamps. I made three to give you inspiration to create your own. You can purchase the lamp parts at home improvement or hardware stores and they're easy to assemble. In my husband's shop was this unique looking Padauk wood and I decided to use it for my first lamp. We cut this piece in half on the table saw and routed out each half for the shaft of the lamp. We glued and clamped the halves together. I had 4 cast iron spurs that have little slits which made it ideal for screwing them to the post. I was hoping the bottom spurs would support the lamp, but I decided to add a wooden base. This wood is beautiful! On the bottom side of the base we drilled holes and routed out a place for the cord. I sprayed the wood and spurs with polyurethane and later added a paste wax to the wood. Then I glued pieces of tooled leather and painted the screws to m...

Star Trinket Box

Image
This is a wood star corner block used for trim on Americana themed windows and doors. I saw this at the home improvement store and envisioned a cute wooden trinket box. I cut a board into pieces the same size as the star trim and glued and nailed it together with a brad nail gun. I spray painted it white and added hinges and a latch from the hardware store. It would be fun to decorate this trinket box for the holidays.

Cross Bench

Image
You can use our Cross Brackets to make this simple bench. The top piece is 11 x 36 x 1 1/2 and the legs are 11 x 16 x 1 1/2 pine. Four Cross Brackets were screwed into the top piece and leg pieces. I removed the hanger from each of the small crosses which I wanted to attach to each leg. Then found a longer screw that would fit it and drilled a hole in the leg piece. Use a counter sink bit if necessary. Screw the cross to the leg piece from the inside. After the dark brown Briwax  finish was applied I noticed my sanding marks which gave it a distressed look. There are several other types of braces on the website that you could use such as Star Braces, Cobb Webb Braces, and Horse Braces. The items used in this project are: Cross Bracket Small Cross D58-078

Hall Tree Coat Rack

Image
I've always wanted to make a Hall Tree Coat Rack. Here's our version of it. The post is 1 1/2" x 1 1/2" and the total height to the top of the star is 5' 8 1/2". I attached Large Coat Hooks and drilled a hole in the top and inserted a Mini Star Nail . For the base, John came up with the idea of attaching the Star Braces for stability. I love this! The wood pieces are glued and screwed into the post. You could paint the hooks and star to match the braces or paint it all the color of your choice. Stain or paint the wood or leave natural.

Horseshoe Cross

Image
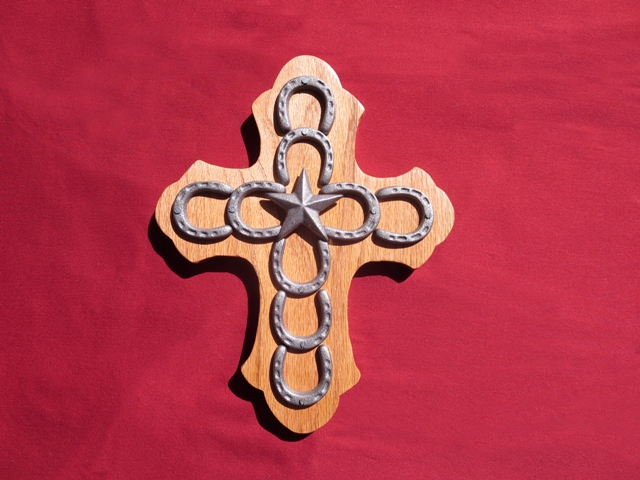
Here's a way to use our Tiny Horseshoes . I drew this cross by hand as you can tell it's not perfect and cut it out of red oak wood on the scroll saw. It is 13" tall x 10" wide x 5/8" thick. After tons of sanding I varnished it. I laid out my horseshoes and screwed them into the wood, then added a Small Star Nail in the center. You could paint the wood or the horseshoes any color and use any wood you desire. This cross would make a nice gift.

Country Tray

Image
When I saw this wall paper border I knew I wanted to make a tray. As we were arranging the sides I thought it might be different to have over lapping corners. So we glued it together one side at a time and used the brad gun for more security. Then we clamped it and let it dry overnight. We drilled holes for rope handles. I did several samples of crackle finish and chose the red with a light tan base coat. Here's the tray with a crackle finish. After it dried I applied the wall paper border with Mod Podge. I used the brayer to smooth it out. When I put a coat of Mod Podge over the top of the picture, the crackle paint started coming off and it made a big mess. So, I had to sand all of that down, put painters tape on the picture and re crackled it. Then I used a spray varnish to seal it. I inserted the rope handles and tied in knots. If I did this again I would apply the picture first, then tape it and apply the crackle finish around i...