Posts

Showing posts with the label pallet wood

Heart Coat Rack

Image
  What the world needs now is LOVE! For Valentine's Day I had to make something with a heart. I was going to make a little pallet wood box and put the wooden heart on the front, but I ran out of time. I looked at the pallet wood pieces I had, and this project came to me. These 2 wooden items are from previous blogs, so they will be recycled twice! This board was part of a cross in another blog, so it has a cut-out section. The wooden heart was drawn and cut with a scroll saw. I placed the wooden heart on the cut-out section and traced it with a pencil. I painted the background and the hooks Tuscan Red. I glued on the wooden heart. I screwed in the hooks and painted the screw heads. A quick and easy and cute Heart Coat Rack, spreading the message of Love. Happy Valentine's Day!

Clocks

Image
It's 'time' to make clocks! You can make a clock out of just about anything. It's easy and fun! We have some left over Saltillo tile we used from a house project and I wanted to make something with one of the tiles. I put together a barn wood frame and routed out a place on the front of the frame for the tile. Epoxy was used to hold the tile in place. Since the frame is square (17.5" x 17.5"), I decided to rotate it to make a diamond clock. Holes were drilled for the 2" Square Berry Copper Conchos , 3/4" Copper Clavos and the clock hands. You can get the clocks and hands at the craft store. Concho screw adapters were used for the conchos or you could glue them. This boot was a previous project transformed into a clock. I attached the clock hands and small brown conchos for the numbers. This is also a previous project transformed into a clock, using the Mini Star Nails and Tiny Horseshoes for the numbers. ...

Hearts

Image
Hearts are the theme today to spread some love around the world! I made these two lariat hearts by simply using a 44" piece of lariat, pulling it into the shape of a heart and wrapping with red leather lace, leaving enough excess for a tassel. I could stop right there. You can hang these anywhere and I thought they looked great! But I wanted to make more hearts! So, I made a heart from pallet boards. I cut a heart shape from plywood, placed the boards together, traced the heart shape on the boards and cut them on the scroll saw, then glued them to the plywood. Actually, I used liquid nails which I don't recommend because it takes too long to dry. This heart is 8" wide x 7" tall. Then I cut 2 small hearts from the scraps. They are 3 1/2" wide x 3" tall. I attached a green lariat to the large heart with a brad nail gun and tied the lariat hearts together with red bows. I glued on the small hearts and added a red bandana. When I throw...

Caps Keys & Coat Rack

Image
From this day forward there will be one post a month on the first Monday of every month. Now, today's project: Create a place for your caps, keys, coats, and umbrellas. Nail horseshoe nails to a Large Horseshoe on a weathered pallet board or any type of wood. Screw in Large Coat Hooks or Hall Tree Hooks . Paint the wood or cast iron any color  you desire or leave as is. This would be very handy right by the door so you can grab on your way out or hang up as you come in.

Western Coat Rack

Image
Make a rustic Western Coat Rack using weathered pallet boards and your favorite picture. I chose, cut and laid out the weathered pallet boards. Then screwed supports on the back. I printed a photo and placed it on the boards with double stick tape. I cut a slit in the photo between the boards to make 2 pieces. With painter's tape I outlined the photo, then removed the photo and the double stick tape. I spread a coat Mod Podge, placed the photo and spread another coat over the top. I smoothed with my fingers and a brayer, but it still wrinkled a bit. Maybe it was the type of paper I used. I pulled up the tape after it dried and screwed in Hall Tree Hooks and Small Coat Hooks . Here's another idea. Screw hooks to your favorite framed picture for quick entry way coat rack.

Horseshoe Pallet Tray

Image
I'm using up the last of my weathered pallet so I wanted to make a tray. This is one of those 'design as you build' projects. Instead of having upright sides I decided to lay them down. I used 3/4" screws and a counter sink bit to attach the three boards to the frame. Here's the side view and you can see how the frame hangs over a bit on the ends. I painted all of the cut ends as rustic as I could to match. I was going to use rope for handles until I saw the painted horseshoes lying there from previous project and I thought 'perfect'! You can use and decorate this tray in many ways.

Breakfast Tray

Image
To make a Rustic Western Breakfast Tray, I took wide weathered pallet boards and cut them the size I wanted. I painted the cut ends by using various watered down mixtures of gray, brown, black and white acrylic paint and wiping it off with a damp rag. I screwed the top boards to the side boards and attached corner braces underneath for strength. I screwed in the Large Horseshoes for handles. The dimensions are approximately 20" wide x 10" deep x 6" tall. This tray can be used as a breakfast tray in bed or on the couch. Or use it for reading a book or writing.

Pallet Wood Box

Image
My initial thought was to make a pallet wood tray with rope handles. That idea evolved into first a box, then a box with a lid. I showed some sketches to my husband and he built a prototype out of rough mahogany without me even knowing about it. How sweet! I was really excited then, but I wanted to make it from weathered pallet boards, so we got to work. We cut the boards as we were fitting it together like a puzzle. One of the end pieces is shorter to allow for the lid to close. We drilled 3/16" holes 1/4" deep in the sides of the lid for 1/2" long wooden dowels 5/8" from the end of the lid. We drilled 3/16" holes 1/4" deep on each side piece 1 1/4" from the end if using 1/2" thick boards. We glued the pieces together with wood glue and used a brad gun to secure it. On the fresh cut ends like the end of the lid shown in this picture I applied a mixture of a little black, grey and brown acrylic paint and wiped...

Pallet Wood Cross

Image
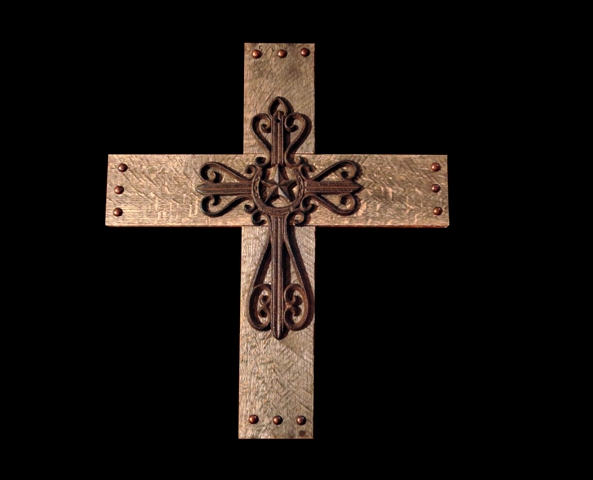
I had some weathered pallet boards and decided to make a rustic cross. I cut them the length I wanted and my assistant/husband cut a dado on the table saw. The dimensions of the cross became 16 1/2" wide x 19" tall. I glued the boards together and attached copper upholstery nails. These photos are to show you the different crosses you could use with the pallet wood cross. You can drill a hole through the cast iron cross and screw it to the wood. You could probably use epoxy to attach this small cross. You could also paint the wood or the cast iron crosses to give it the effect you wanted. Here are the cast iron crosses shown in this project: Cross with Star and Horseshoe Cross with Horseshoes and Star Cross D58-080 Cross D58-090 Send us photos of your projects along with instructions and we will post them right here on the blog. Also we welcome your questions, suggestions or comments.