Posts

Showing posts with the label leather craft

Buckle Display Strap

Image
  Buckle Display Strap Strap - 45" x 5" (Hair-on cowhide with 8-9 oz. backing) Tooled Pieces - 5" x 3 3/4" Buckle straps - 1 1/2" x 2 3/4", 3/8" from right edge Spacing between buckle straps - 2 1/2" Buckles - 4 1/2" x 3 1/2" 2 D-rings I was asked to make a buckle display on a strap. I looked on the internet and found one that looked like a cinch, so I decided to make one to resemble a cinch. I had several cowhide scraps that were given to me by the person that wanted the buckle display. I used one of those hides for this project. I borrowed several buckles from a friend so I would know how long and wide to make it. The customer wanted to display 6 or 7 buckles and I decided to make it 7. Go for the most, right? I cut a piece of cowhide about 48" long to allow for riveting on D-rings x 5" wide.  The customer wanted their brand on it, so I designed a tooling piece around their brand. I tooled a Texas star for the bottom of the ...

Leather Tray

Image
I always wanted to mold leather into a tray. I had a piece of embossed leather and used an old 8" x 8" metal cake pan for the mold. I cut flaps on the corners of the leather and failed to take pictures of that step. Here is a diagram of how I made the cuts. I filled the sink with warm water enough to cover the leather and let it soak for a minute. I molded the leather onto the pan. I used thin pieces of wood on the sides to uniformly clamp the leather to the pan. Since a bit of metal color came off on the leather, it is a good idea to spread plastic wrap over the pan before the leather is applied. I let this dry completely. It worked very well. I put a leather finish on the leather. The plan was to glue the flaps and attach rivets, but I thought it would look better with a smooth leather strip around the outside. The leather strip is molded just like the tray. This time I put plastic wrap on the cake pan, then placed the leather tray over it. I...

Hat Bands

Image
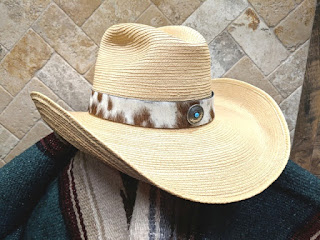
Fall Activities are coming up and what better way to show off your style than to wear a hat band that you made yourself. Here are 6 different styles that are easy to make. I used a palm leaf hat to model the hat bands. Just wet it in the sink, form it into any style you want, and let dry. If you make a mistake, rewet it and fix it. I attached a Rhinestone Star Pin to a grosgrain ribbon for this style. You can also add pins to the hat. I wove a 5/8" x 46" black grosgrain ribbon through eight 1 1/2" slotted conchos. Tie the ribbon in a square knot in the back and let the ends dangle. Or you can tie it in a bow. I cut a 1" x 23 1/2" strip of veg tan leather, painted it black and attached 2 types of rivets. I cut an extra piece for a keeper in the back. I stapled the ends together and glued the keeper on the band using Titebond. I got a little off on the staples but it worked. Here's how it looks in the back. ...

Western Napkin Cuff

Image
I thought it would be neat to make a leather napkin cuff. It's something your guests would not normally see and they will be impressed especially since you made them yourself. You can choose from many different kinds of Conchos  in our store. I cut a 7 5/8" x 1 1/2" strip of leather from a scrap bag which you could get at Tandy Leather Company or the craft store. I like this sage color since it went well with the colors in this napkin. I pressed the concho against the leather where I wanted it to go to make an indention. Use a leather hole punch to punch a hole. This hole was 4.8mm. Punch a hole on the other end the same way. Loop the leather strap around to fit it together and attach screw. I used my fingernail since it's hard to get a screw driver into the loop. For a different strap look I pulled the two ends together and attached the concho. I think it turned out nice. There are so many things you could do like putting studs in the leather and us...