Posts

Kitchen Remodel

Image
Happy New Year! The New Year is about new beginnings. Well, my kitchen has a new beginning! After 35 years I decided to give my kitchen a new look! This is a photo of the old kitchen with Saltillo tile floor and ceramic tile countertops. In the new kitchen the cabinets are made of reclaimed oak from old barns and buildings. Notice we removed the cabinet above the bar. Wood look tile floors, Dekton countertops, rusty looking pulls and travertine backsplash complete the new look. The fluorescent light will be replaced with LED down lights. The wood look tile for the floor was cut in half and used for the backsplash. The same tile frames the 3" x 6" travertine tile which is in a herring bone pattern. I added Medium Star Nails above the oven. I painted them to match the pulls. The low bar is made from old pecan and wow, what character! The bar chairs will be refinished and cushions replaced. The wood for the cabinets was planed smooth, but I used...
Christmas Tree

Image
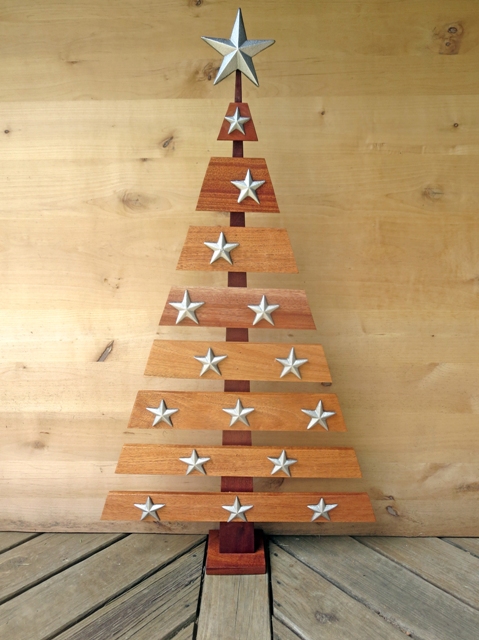
This is my version of the pallet wood Christmas Tree. This tree is made with mahogany since we have plenty of it in our shop. A mahogany base is screwed and glued onto a dagger board drop. My husband makes dagger boards for sailboats. They are used to keep the boat from sliding sideways during sailing. Mahogany boards are screwed onto the dagger board drop. A straight edge is used to draw a line where you want to cut. Cut the boards with a jig saw. A coat of varnish or sealer gives the mahogany a rich tone. Nail Small Star Nails to a board to spray paint with metallic silver. If you drill a hole a little smaller than the nail, they easily tap into the mahogany. A Large Star Nail was added to the top. Place this tree on your porch or brighten up a corner of your home. Merry Christmas!

Rustic Tray

Image
Trays are good to have around during the holidays. Use them to serve your guests or decorate with your favorite holiday décor. Take this idea and make it your own. I cut 4 pallet boards 13 1/2" long. I used a nail gun to nail 2 boards 19 3/4" long to the back of the 4 short boards. I cut off pieces of a pallet support board for the handles and nailed them into the bottom boards. I added Clavos to the top of the handles. I added smaller Clavos to the ends of the 4 short boards. Happy Holidays!

Table Lamps

Image
This is my first time making table lamps and it's so easy that I had ideas for about 10 western style lamps. I made three to give you inspiration to create your own. You can purchase the lamp parts at home improvement or hardware stores and they're easy to assemble. In my husband's shop was this unique looking Padauk wood and I decided to use it for my first lamp. We cut this piece in half on the table saw and routed out each half for the shaft of the lamp. We glued and clamped the halves together. I had 4 cast iron spurs that have little slits which made it ideal for screwing them to the post. I was hoping the bottom spurs would support the lamp, but I decided to add a wooden base. This wood is beautiful! On the bottom side of the base we drilled holes and routed out a place for the cord. I sprayed the wood and spurs with polyurethane and later added a paste wax to the wood. Then I glued pieces of tooled leather and painted the screws to m...

Western Style Mirrors

Image
I've always wanted to make western style mirrors. I bought a couple of mirrors from the craft store, one 12"x 12" and the other 10" round. I used the weathered wood frame from the Clocks blog. Since I used epoxy to 'glue' in the tile, it took a while to get it out and clean it up. I had to rout out a little wider for the mirror since it was larger. I cut strips of leather 1" wide and attached with Star Tacks . My husband's industrial strength glue gun worked nicely for mounting the mirror in the frame. A different idea would be to attach hair on cowhide pieces to the corners with upholstery nails and add barbed wire on the sides. Now for a lariat mirror. I took a lariat and wound it tight to fit around the 10" mirror. I first taped it together  so I could wrap leather lace on each side. Then I attached leather laced conchos. I cut a piece of plywood on the scroll saw a little smaller than the lariat and glued the mirror onto it....

Horseshoe Cup Holder

Image
This project is a Horseshoe Cup Holder made with wood and Tiny Horseshoes . I drew a design for the feet and cut it on the scroll saw. I glued them onto a wood post and painted it a rustic gray. I screwed on the horseshoes including one on top. You could add more horseshoes and spray paint it your desired color for a jewelry stand.

Clocks

Image
It's 'time' to make clocks! You can make a clock out of just about anything. It's easy and fun! We have some left over Saltillo tile we used from a house project and I wanted to make something with one of the tiles. I put together a barn wood frame and routed out a place on the front of the frame for the tile. Epoxy was used to hold the tile in place. Since the frame is square (17.5" x 17.5"), I decided to rotate it to make a diamond clock. Holes were drilled for the 2" Square Berry Copper Conchos , 3/4" Copper Clavos and the clock hands. You can get the clocks and hands at the craft store. Concho screw adapters were used for the conchos or you could glue them. This boot was a previous project transformed into a clock. I attached the clock hands and small brown conchos for the numbers. This is also a previous project transformed into a clock, using the Mini Star Nails and Tiny Horseshoes for the numbers. ...